
What is an Islandora 8 Microservice?
A Microservice will create a derivative file and attach it to an Islandora node as media object. The microservice requires:
-
A Drupal Action - defined in code, usually a bespoke Drupal module.
-
A Drupal Context to determine when the Action will be triggered . This is defined and persisted through configuration.
-
Routing configuration - created on the server using Karaf.
For this example I’ll be using the creation of a FITS technical metadata file as an example. The file will be generated from an internal webservice which will accept an Original File as input and generate a Fits File as output to be persisted as a Media attached to the original node.
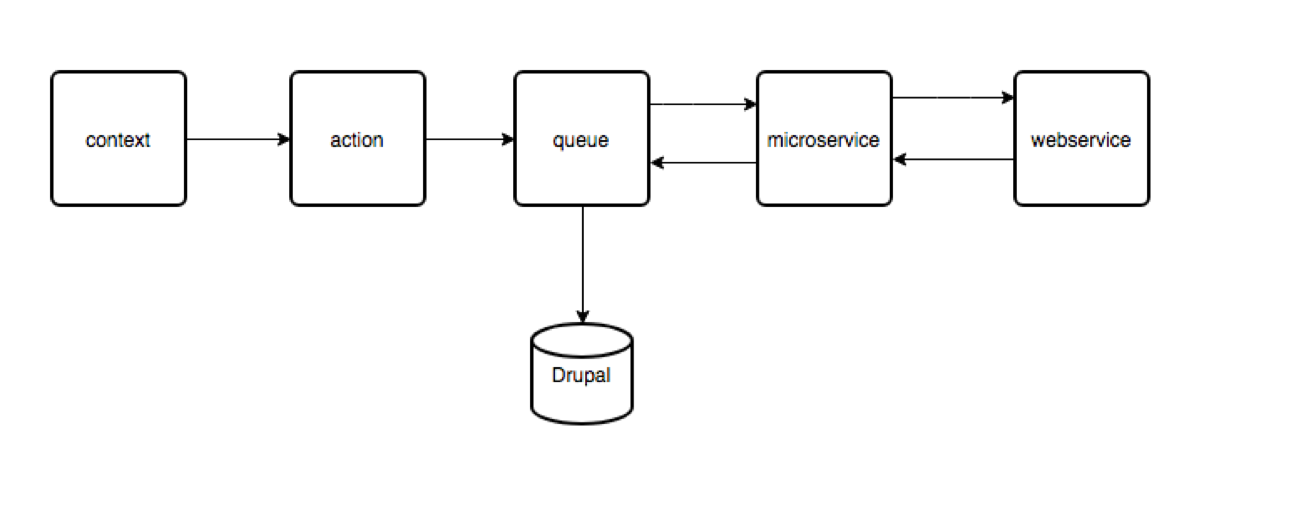
Workflow - a context triggers an action, which adds a derivative request to a queue, which calls the microservice, which sends the asset to the webservice, which returns an XML file to the microservice, which puts that back on a queue, which persists that XML back to drupal media attached to the original Drupal node.
Create Drupal 8 Module
Create and enable Islandora FITS module - machine name islandora_fits. I like to use Drupal console for this part.
Create a new Action Plugin
Create file islandora_fits/src/Plugin/Action/GenerateFitsDerivative.php to hold the GenerateFitsDerivative class which must extend AbstractGenerateDerivative defined in the islandora module.
Note: The id and label are defined in annotations, This is not optional.
/**
* Emits a Node for generating fits derivatives event.
*
* @Action(
* id = "generate_fits_derivative",
* label = @Translation("Generate a Technical metadata derivative"),
* type = "node"
* )
*/
Alter the default form to fit the needs of your derivative in the buildConfigurationForm function, and define default values in the defaultConfiguration function.
Configure Action
Once the action has been created in code it must be instantiated in configuration.
Navigate to www.example.com/admin/config/system/actions
Select ‘Generate a Technical metadata derivative’ (or whatever you called your action)from the dropdown under Create an Advanced Action. Fill in details (defaults are provided from the recently created defaultConfiguration function).
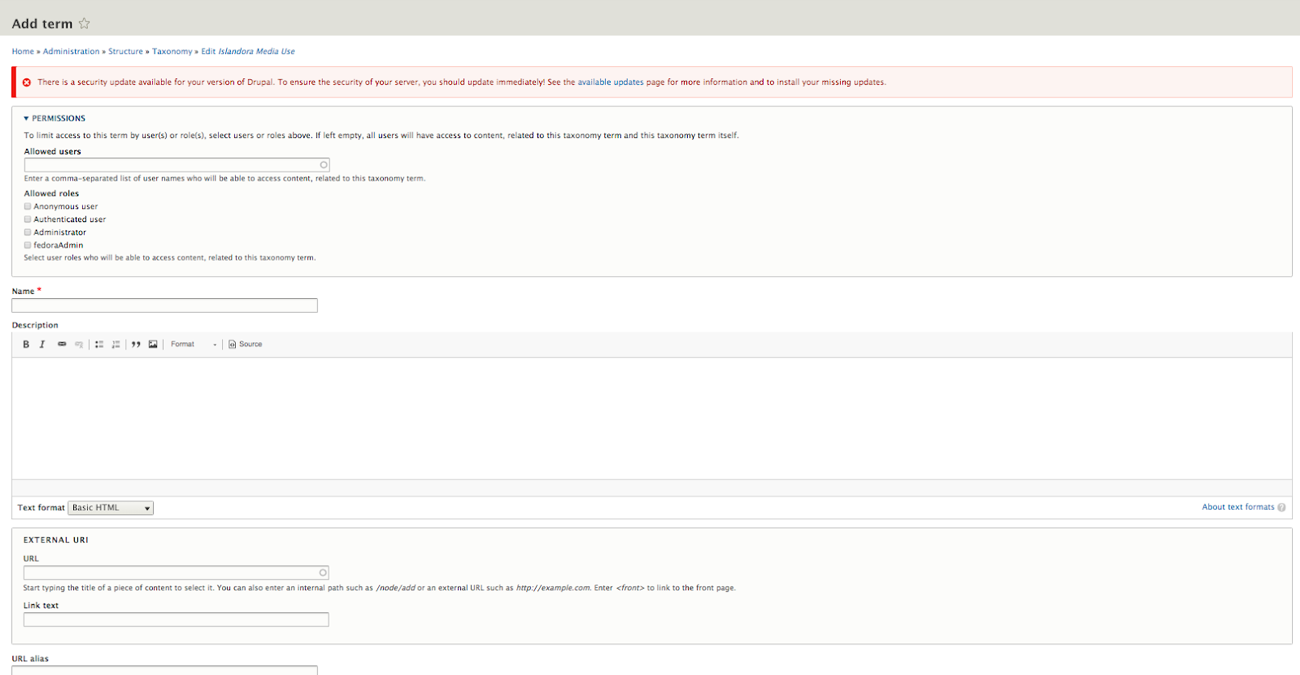
A new Media Use term will be required to tag the incoming media file. This can be created at /admin/structure/taxonomy/manage/islandora_media_use/add.
The URI field is mandatory.
Create Context
Context is a series of one or more Conditions that must be met (or specifically NOT met) to trigger one or more Reactions.
A Context will tie the recently created Action to an event.
Navigate to admin/structure/context/ and click add.
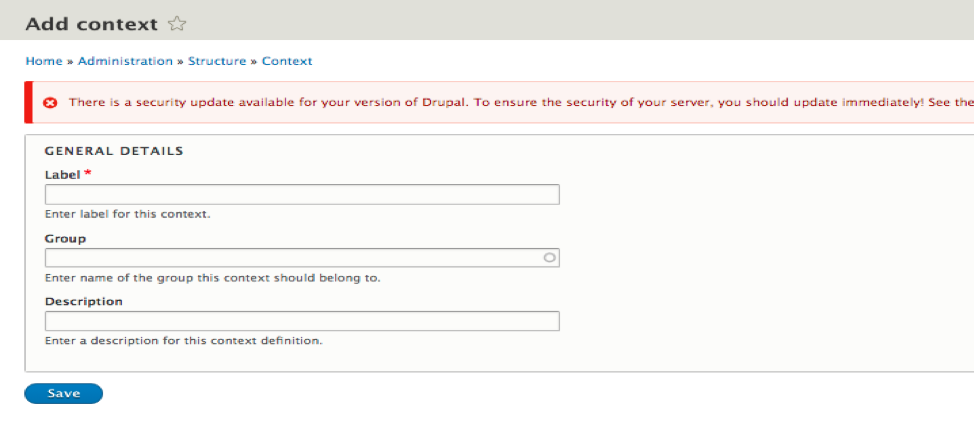
Fill in identifying information, save, and configure.
Create Condition
We create a Condition by selecting Add, and choosing Media Has Term as the condition, and fill in Original File as the required term. We’ll only collect technical metadata on original files.
Create Reaction
We now assign a Reaction. We’ll choose Derivative, and select the action we’ve already configured. (Generate a Technical metadata derivative, for this example)
Save and continue.
Build the Endpoint to make the Derivative
The microservice will programmatically produce a new file using the ingested media file as input. This new file could contain an altered version of the original (like a web friendly image from a TIFF), or metadata extracted from it (like an OCR text stream, or as in this case, the FITS technical metadata). The created derivative can be generated by a web call to an internal or external server, an exec call, or code internal to the microservice app. The only restriction is that persistable output must be available by a url.
The Alpaca service will provide the microservice with a Request object with ‘Apix-Ldp-Resource’ and ‘Authorization’. The Authorization header contains credentials required to get the original asset, and the Apix-Ldp-Resource header has the asset’s uri.
Install FITS Webservice
FITS xmls are generated from an easily installed web service.
Get the latest fits.zip and fits.war
(on my box I had to install a missing zip library with ‘sudo apt-get install php7.1-zip’)
Install following their instructions.
Copy the .war file to your webapps directory and test.
Edit the catalina.properties file on the Drupal server by adding the following two lines to the bottom of the file-
fits.home=/<path-to-fits>/fits
shared.loader=/<path-to-fits>/fits/lib/*.jar
Restart Tomcat and test with
curl -k -F datafile="@/path/to/myfile.jpg" http://example.com:8080/fits/examine
(note: the ‘@’ is required.)
Creating the Executable
For this microservice I chose Symfony 4 as the Framework, but all that is required is any technology that can be accessed through a url to produce the required output.
I built a very small a Symfony App to process inputs from Drupal by sending them to the FITS webservice. The result is streamed out and is automatically picked up by Karaf and persisted back to Drupal as a media object connected to the original Drupal node.
The Symfony app will need its own port, so to develop and debug we’ll need to forward a port on the VM. Add config.vm.network "forwarded_port", guest: 8050, host: 8050 to the Vagrant file, then do a vagrant reload.
The App runs by entering php bin/console server:start *:8050 in the App root folder.
The server is stopped with php bin/console server:stop
The location of the FITS webserver is stored in the .env file in the root dir of the Symfony app. This will have to be reconfigured if the FITS server is anywhere other than localhost:8080/fits
Wiring it all together
The Karaf framework is already in place, and surprisingly easy to configure. We need a blueprint.xml file in the /opt/apache-karaf-4.0.8/deploy directory. This is easily done, but must be done from the command line on the server (if not using Ansible to build) so be sure the url of the service is stable before creating this file.
Copy an existing blueprint file and give it a unique java style name - in this case I cloned ca.islandora.alpaca.connector.homarus.blueprint.xml to
ca.islandora.alpaca.connector.fits.blueprint.xml and changed a few identifying properties under
cm:property-placeholder.
Changes needed:
-
persistent-id - (Can be anything unique)
-
in.stream, (the queue name previously defined in the Drupal Action)
-
derivative.service.url are required. (the uri defined in your microservice)
Changed xml looks like this:
<cm:property-placeholder id="properties"
persistent-id="ca.islandora.alpaca.connector.fits"
update-strategy="reload" >
<cm:default-properties>
<cm:property name="error.maxRedeliveries" value="5"/>
<cm:property name="in.stream"
value="activemq:queue:islandora-connector-fits"/>
<cm:property name="derivative.service.url"
value="http://localhost:8050/fits/process"/>
</cm:default-properties>
</cm:property-placeholder>
Publishing your new Microservice with Ansible
A microservice on an existing Islandora 8 stack using the previous steps, but if it’s to become part of the playbook additional steps are required.
Adding the Term
A term to describe your new media type will have to be added to the Islandora Media Use taxonomy. These terms are normally imported from islandora_demo on installation, but your term could be added to the module’s config file. Like all Islandora terms, it must have an external uri to allow for consistent behaviour across various installations.
Adding the Action and Context
The action is described in code, and the context is created in configuration. Both will have to be exported. With context already defined through Drupal config navigate to http://example.com/admin/config/development/configuration/single/export select context with the first selector, and the context name with the second. The required name for a new file will show at the bottom of that screen, and the required contents of that new file will show in the display box. Copy the contents of the output area to a file under your_module/config/install. Remove the initial uuid from your file - its unlikely to cause a problem, but Drupal will generate new one for you and a UUID should be unique.
The file name will be of the form context.context.your_context_machine_name.yml
Now do the same with action - the file name will be
system.action.generate_a_technical_metadata_derivative.yml
Configuring the Server
Microservice Deployment
The built-in php server should not be used in a production environment. A production-ready server will have to be configured to run the microservice. This would normally be set up using the Apache2 server already created by the playbook. If your microservice was created with a modern PHP framework mod rewriting will be required to allow your urls to be recognized. For this example an additional server running on port 8050 will be configured and apache.conf will be edited to allow rewriting.
A new site can be defined in /etc/apache2/sites-available (I called mine CrayFits.conf) and softlinked in /etc/apache2/sites-enabled.
FITS Webservice Deployment
The FITS webservice from Harvard will be deployed to the Tomcat webapps directory used by Fedora and accessible through port 8080. Catalina.properties will be appended to let the webapp know where the FITS jar files are located.
Configuring the Queue
A role will be required to construct the blueprint.xml file telling Karaf how to tell Alpaca how to handle our newly defined queue.
Developer's Notes
The Karaf app can be run with - /opt/karaf/bin/client
Postman is a great tool for testing url responses.